
Most people assume a single red light panel in a bedroom corner delivers full-body recovery. That mistake leaves large portions of your body under-dosed and wastes months of sessions.
Learning how to build a red light therapy recovery room at home means mounting multiple panels to cover your entire body at a consistent distance, rather than relying on one device. Photobiomodulation requires specific irradiance levels across all target tissue simultaneously. Spacing devices evenly ensures every area receives the intended 660 nm and 850 nm wavelengths.
The sections ahead break down spatial planning, electrical safety, and panel placement so you can calculate exact coverage for your space. You will finish with a working blueprint to assemble a setup that matches clinical dosimetry guidelines.
Why create a red light room instead of using a single device?

Most buyers assume adding a second panel to a bedroom corner doubles their results. The physics points the other way. A casual spot treatment relies on holding a device in place or standing awkwardly close to a single source, introducing variables like ambient light interference and inconsistent positioning that degrade the actual dose reaching the skin. A dedicated photobiomodulation environment eliminates those variables.
The core red light therapy room benefits stem from geometry. When you surround the body with simultaneous multi-angle exposure, you achieve uniform full-body irradiance rather than a bright center fading into useless edges. This consistency maintains predictable session timing. You stop guessing whether your shoulder received the same energy as your lower back. Treating multiple angles at once also reduces overall treatment duration because photons reach more tissue simultaneously without requiring the user to rotate every few minutes.
Building a home recovery space requires treating it as a precision optical environment rather than an interior design project. Kevin Zhang, Chief Technology Officer at REDDOT LED, applies 15+ years of medical-grade LED manufacturing experience to this exact principle: consistent quality is achieved through standardized production processes and reliable component sourcing, not by stacking random hardware in a spare closet. The room itself becomes part of the optical system.
Creating a dedicated space allows users to integrate both standing panel arrays and horizontal therapy surfaces within the same footprint. You can position high-output devices for deep tissue work while placing lower-intensity units for localized facial care. Understanding how to build a red light therapy recovery room at home starts with recognizing that the architecture dictates the therapy.
This spatial planning determines everything that follows in the electrical and structural phases.
Prerequisites for engineering a safe and effective recovery space
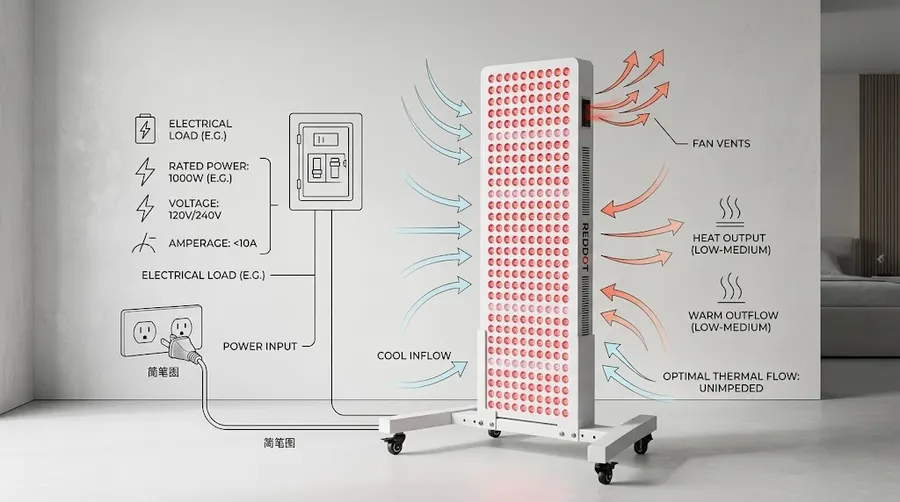
AA high-power LED array can place a significant continuous load on a residential electrical circuit. Before installing multiple panels, calculate the total current draw and confirm that the circuit, wiring, outlets, and protection devices are appropriately rated. Evaluating thermal dissipation and electrical safety is the first step before installing high-power panels in an enclosed space. IEC 60601-1 safety standards govern professional medical device development precisely because sustained thermal output in confined areas creates real hazards.
Electrical load calculations follow the National Electrical Code (NFPA 70). Residential circuits typically handle 15 or 20 amps. To calculate amperage draw when deploying multiple 100W to 500W therapy panels simultaneously, divide the total wattage by the line voltage. Four 300W panels on a 120V circuit draw 10 amps. That leaves almost no margin on a 15-amp breaker for other devices, making dedicated circuits necessary for larger builds.
Structural requirements demand equal attention. Consider a 300x5W LED configuration delivering 161 mW/cm² at 6 inches within a 69x22x6cm footprint and 7kg weight, matching the RDS1500 Red Light Panel specifications. Mounting three of these vertically means anchoring over 21kg to drywall. Standard plastic anchors will fail. Lag bolts driven directly into wooden studs or toggle bolts rated for heavy loads are mandatory.
Verifying manufacturing quality controls protects the investment long-term. Devices built under ISO 13485 certification undergo multi-stage inspection and performance testing. Genuine LED beads rated for 50,000-hour lifespans paired with reliable internal drivers manage sustained heat far better than unverified components that degrade after a few months.
Before mounting any hardware, verify your walls can bear the static load and your wiring can handle the continuous current.
Assessing your room dimensions and ventilation
Room volume dictates thermal accumulation. Active cooling fans built into high-output panels push hot air away from the diodes, but in a small enclosure, that exhaust recirculates directly back into the intakes. Panels require specific clearance distances behind them—typically several inches—to allow airflow to escape rather than pooling against the wall.
A practical baseline for calculating minimum cubic footage involves dividing the room’s total volume by the installed LED wattage. Higher wattage densities demand proportionally larger rooms or active exhaust ventilation. If a small room holds 2,000W of LED power without an exhaust fan pulling air out, operating temperatures will climb past the thermal limits of standard consumer electronics. Proper ventilation transforms a hazardous box into a functional recovery zone.
Exploring your red light options and spatial configurations
Architectural approaches to building a red light room fall into distinct tiers based on budget and therapeutic goals. A single red light therapy tower suits targeted, budget-conscious builds focusing on localized recovery zones. It handles one side of the body at a time, requiring the user to rotate halfway through a session.
Deploying two towers changes the math entirely. Anterior and posterior coverage happens simultaneously, cutting total session time in half while maintaining the same therapeutic dosage. The body absorbs photons continuously without interruption.
The full immersion box uses four or more sides for athletes or clinical-grade home use. Managing intersecting light fields requires careful spacing so overlapping beams do not create hot spots that exceed safe irradiance thresholds. Cumulative thermal output in a four-sided array also demands aggressive ventilation. Precise hardware customization directly impacts recovery efficiency. In a documented case involving a boutique sports recovery studio in California, supplying customized mounting brackets alongside multi-wavelength panels reduced client treatment times by 50%. Exact spatial alignment matters as much as raw power.
| Configuration | Coverage Area | Session Time Impact | Ventilation Demand |
|---|---|---|---|
| Single Tower | Localized / One side | Baseline | Low |
| Dual Tower | Anterior & Posterior | Halved | Moderate |
| Full Immersion Box | 360-degree | Minimized | High |
Selecting the right layout depends on whether you prioritize speed or initial cost.
RLT tower mounting options and beam angle selection
Beam angle dictates optimal mounting distance and wall spacing. A device offering >200 mW/cm² irradiance at 6 inches combined with interchangeable 30-degree and 60-degree lens options illustrates this clearly. A 30-degree lens concentrates photons into a tight column, requiring precise alignment but allowing greater distance from the wall. A 60-degree lens spreads the field wider, forgiving minor positioning errors but demanding closer proximity to maintain intensity.
Fixed wall mounts lock the panel in place permanently. Adjustable ratchet rope hangers allow users to alter the distance dynamically during a session, changing how the inverse square law decays the irradiance in real time. Moving a panel just two inches closer significantly increases the dose.
For wall-mounted setups, benchmark devices help establish expectations. Units featuring 300pcs x 5W LEDs with included hanging hardware provide a reliable template for flexible home installation. Knowing your chosen lens angle prevents wasted wall space and ensures the light actually reaches the target tissue.
Step-by-step process to build your red light therapy room
Learning how to create a red light therapy room requires following a strict chronological sequence. Skipping steps compromises either safety or optical performance.
- Clear and paint the space. Remove furniture and apply non-reflective matte paint to all walls. Glossy finishes cause stray light scatter, bouncing photons unpredictably and reducing the direct dose reaching the body.
- Reinforce wall studs. Locate the wooden framing behind the drywall using a stud finder. Mark the exact bolt locations for each panel, ensuring the anchors align with solid wood capable of supporting heavy multi-panel arrays.
- Run dedicated electrical circuits. Pull proper gauge wiring from the breaker box to the room. Install whole-room surge protection to safeguard sensitive LED drivers from voltage spikes that degrade internal components over time.
- Mount the primary panels. Use a laser level to guarantee symmetrical placement. Measure the distance from the floor and between panels identically on both sides so the user receives uniform irradiance regardless of where they stand.
- Integrate secondary close-range stations. Add compact units for targeted facial or joint therapy alongside the primary full-body array. A lightweight desktop panel weighing 0.44kg and delivering 35 mW/cm² at 15cm with a 1:1 wavelength ratio fits perfectly on a small shelf for localized work.
Following this sequence prevents costly rework and ensures the electrical infrastructure supports the physical hardware safely.
Integrating horizontal therapy surfaces
Not all recovery happens standing up. Incorporating floor-based equipment provides supine treatment options without consuming additional wall space. A mat measuring 160×60 cm containing 945 LED beads configured in a 4:1 ratio of 660nm to 850nm wavelengths delivers full-body coverage while lying down. The YD007 Red Light Therapy Mat operates at 75W with adjustable pulse frequencies, offering five intensity gears and timer controls ranging from 10 to 90 minutes. At 3.6kg, it remains easy to roll and store when the room serves other purposes.
Routing power cables across the floor introduces trip hazards. Use low-profile cord covers secured with adhesive backing to route wires along the baseboards. Keeping the walking path clear maintains a hazard-free environment in the recovery zone, especially when users enter or exit the room with their eyes adjusting to the intense light.
How to verify your setup delivers clinical-grade results
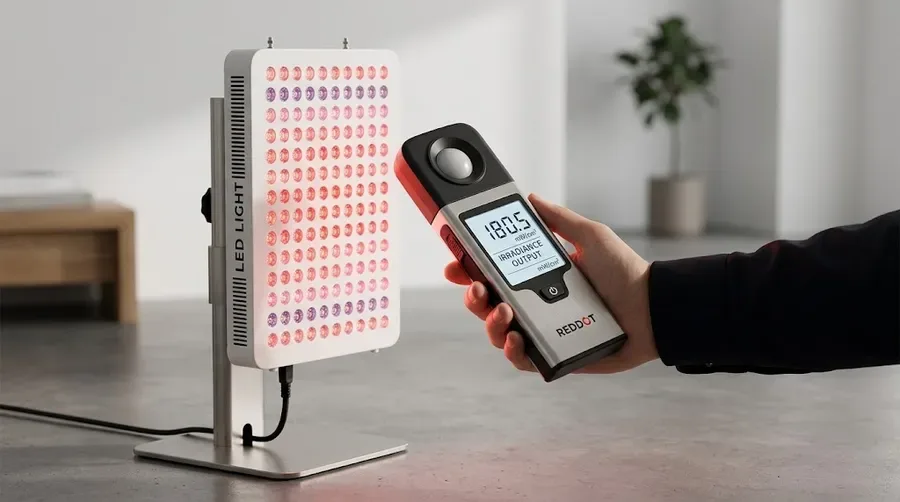
Building the room completes only half the project. Validating the output ensures the hardware actually delivers what the spec sheet promises. Illuminating Engineering Society lighting measurement standards provide the framework for testing. Use a calibrated solar power meter to measure actual irradiance in mW/cm² at your planned treatment distance. Hold the sensor exactly where your skin will be, perpendicular to the light source.
Physics governs the results. The inverse square law dictates that doubling the distance from a point source drops the irradiance to one-quarter of its original value. Moving just a few inches away from a panel drastically changes the therapeutic dose. Map the “sweet spot” in your newly built room by taking measurements at multiple distances and marking the floor where the target intensity occurs.
Wavelength verification matters equally. Peer-reviewed photobiomodulation literature documents that specific stimulation of cytochrome c oxidase requires precise 660nm red and 850nm near-infrared wavelengths. Cheap devices often drift outside these therapeutic windows due to poor LED binning, delivering visible light that fails to penetrate tissue effectively.
Check for flicker and electromagnetic interference by recording the panels with a smartphone camera set to slow motion. Visible banding indicates poor driver quality. EMI from cheap power supplies can interfere with other electronics and negate the relaxation benefits of the recovery space.
A verified setup separates a genuine recovery tool from an expensive space heater.
Benchmarking against professional standards
Compare personal room measurements against published clinical data to ensure the home setup achieves a comparable joules-per-square-centimeter dosage within a reasonable timeframe. Multiply the measured irradiance by the session duration in seconds to calculate total energy delivered. If clinical protocols target a specific energy density, adjust your session length accordingly rather than assuming a fixed timer works for every device.
Hardware flexibility makes this tuning possible. Devices equipped with adjustable pulse frequencies spanning 1 to 40 Hz and dimming capabilities from 0% to 100% allow users to fine-tune their verified setup for different recovery protocols. Lower intensities suit acute inflammation, while higher pulsed outputs target deeper muscle tissue. Measuring first and adjusting second guarantees the room performs exactly as intended.
Common failure points and troubleshooting your red light room
A well-planned photobiomodulation environment fails quietly. The most frequent hidden problem is thermal throttling. When ventilation around LED drivers is inadequate, internal temperatures rise and the electronics automatically reduce power output to protect themselves. The lights still appear bright, but the therapeutic dose drops silently. This is why learning how to build a red light therapy recovery room at home requires treating the space as a precision optical environment rather than a simple interior design project.
Mixing panels from different manufacturers creates another common issue. Devices with slightly different 660nm/850nm wavelength ratios or beam angles produce uneven “hot” and “cold” zones across the body. A panel using a 45-degree lens delivers light differently than one using a 30-degree lens, leaving gaps in coverage. Electrical tripping also catches builders off guard. Turning on multiple high-power panels simultaneously generates an inrush current that trips standard residential breakers, even if the continuous draw stays within limits per National Electrical Code guidelines.
Component degradation compounds these problems over time. Inferior lenses yellow under prolonged near-infrared heat exposure. This alters the beam angle and reduces surface irradiance after only a few months of use. Recognizing these failure modes early prevents wasted sessions.
| Failure Point | Symptom | Root Cause |
|---|---|---|
| Thermal throttling | Reduced efficacy despite normal brightness | Inadequate ventilation causing driver power reduction |
| Mixed wavelengths | Uneven sensation across the skin | Mismatched 660nm/850nm ratios or lens angles |
| Breaker tripping | Power loss when turning on devices | Inrush current exceeding breaker instantaneous rating |
| Lens yellowing | Gradual drop in light intensity | Uncertified plastics degrading under near-infrared heat |
Matching all equipment specifications before installation eliminates most of these variables. Understanding how to create a red light therapy room means planning for thermal management and electrical capacity from the start.
When to consult a professional
The boundary between DIY assembly and licensed electrical work is clear. Mounting panels and arranging floor mats falls within typical home improvement. Modifying breaker boxes or running new 240V lines for commercial-grade setups does not. According to the National Fire Protection Association (2023), any alteration to a main service panel requires a licensed electrician to ensure compliance with local safety codes.
Readers who feel overwhelmed by optical engineering parameters should seek guidance directly from manufacturers offering OEM/ODM technical support. Generic retail advice rarely accounts for specific irradiance calculations or multi-device synchronization. Manufacturers like REDDOT LED, which maintain ISO 13485-certified quality systems and employ dedicated R&D teams, provide documentation that clarifies safe operating distances and electrical requirements. Asking a qualified source prevents expensive mistakes. Proper troubleshooting ensures the room performs as intended for years.
Key Takeaways
A dedicated home recovery room delivers a consistent photobiomodulation dose by controlling ambient light and fixing the distance between 660 nm or 850 nm LED sources and the skin. Controlling these physical variables prevents the irradiance drop-off that occurs when panels are placed casually in shared living spaces, ensuring the light energy actually reaches target tissue at therapeutic levels.
Frequently Asked Questions
How to create a red light therapy room?
Creating a red light therapy room requires selecting a space where you can block ambient sunlight, mount panels at a fixed distance from the user, and manage heat dissipation. Standard home panels typically run 30–100 mW/cm², meaning the mounting distance must match the manufacturer’s specified testing range to deliver an accurate dose. Blocking external light is necessary because ambient illumination interferes with the specific wavelengths reaching the skin. Managing the electrical load is equally important, as multiple high-wattage devices on a single circuit can trip breakers or create fire hazards.
Can I build my own red light therapy device?
Building a functional red light therapy device requires sourcing correctly binned LEDs, engineering thermal management systems, and verifying output with calibrated spectrometers. While individual 660 nm and 850 nm diodes are available for purchase, assembling them without optical lenses or proper heat sinks results in rapid degradation and inaccurate irradiance. Devices intended for human use fall under regulatory scrutiny; manufacturers operating in regulated markets must comply with standards like IEC 60601-1 for electrical safety. Attempting a DIY build bypasses the multi-stage performance testing required to ensure the device will not cause retinal or skin damage over time.
Do you need a license to offer red light therapy?
Offering red light therapy commercially generally requires compliance with local health regulations, though specific licensing depends on whether the device is classified as a medical device or a general wellness product. In the United States, the FDA classifies many low-level light therapy devices, and marketing them for specific medical conditions requires appropriate clearance rather than simple registration. Manufacturers supplying commercial clinics often hold ISO 13485 certification to demonstrate their quality management systems meet medical device standards. Operating unapproved equipment in a clinical setting exposes businesses to liability and potential seizure by customs or regulatory authorities.
Does red light actually help with recovery?
Red light therapy supports recovery through photobiomodulation, a process where specific wavelengths stimulate mitochondrial function to increase ATP production in cells. Peer-reviewed research documents that wavelengths in the 660 nm and 850 nm ranges penetrate tissue to varying depths, influencing cellular metabolism and inflammation pathways. The biological mechanisms are established, but actual outcomes depend heavily on delivering the correct dosage, which requires verified irradiance data rather than relying on advertised LED counts alone. Clinical dosimetry guidelines dictate that both wavelength accuracy and power density must be maintained consistently for the therapy to produce measurable physiological effects.
References & Sources
- International Electrotechnical Commission (IEC). “IEC 60601-1: Medical electrical equipment – General requirements for basic safety and essential performance.”
- U.S. Food and Drug Administration (FDA). “Light-Based Medical Devices.”
- International Organization for Standardization (ISO). “ISO 13485: Medical devices — Quality management systems.”
- Wikipedia. “Photobiomodulation.” Accessed 2024. https://en.wikipedia.org
Related Guides
A sports recovery studio in California replaced its single spot-treatment devices with multi-wavelength panels and custom mounting brackets. Treatment times dropped by 50 percent because simultaneous full-body exposure eliminated the need to reposition clients between zones. That same principle applies when you plan how to build a red light therapy recovery room at home. Moving from a single handheld unit to a controlled environment changes the variables you manage: ambient light interference drops, positioning stays consistent, and session timing becomes repeatable.